Truth is—between chasing deadlines, skipping meals, and maybe forgetting that second glass of water, staying healthy can feel like a full-time job. But what if your wellness routine could be as simple—and delicious—as a gummy? That’s where DIY Green Apple Ginger Gummies come in. These tart, tangy, and just-spicy-enough bites pack real ingredients into something you’ll actually crave daily.
No artificial junk. No sugar crashes. Just real flavor, functional ingredients, and the kind of glow-up your wellness routine deserves. Pair them with meals like this Anti-Inflammatory Sweet Potato Salad Recipe for a wellness combo that hits every note—flavor, function, and feel-good fuel.
Green Apple Ginger Zing Gummies
Ingredients
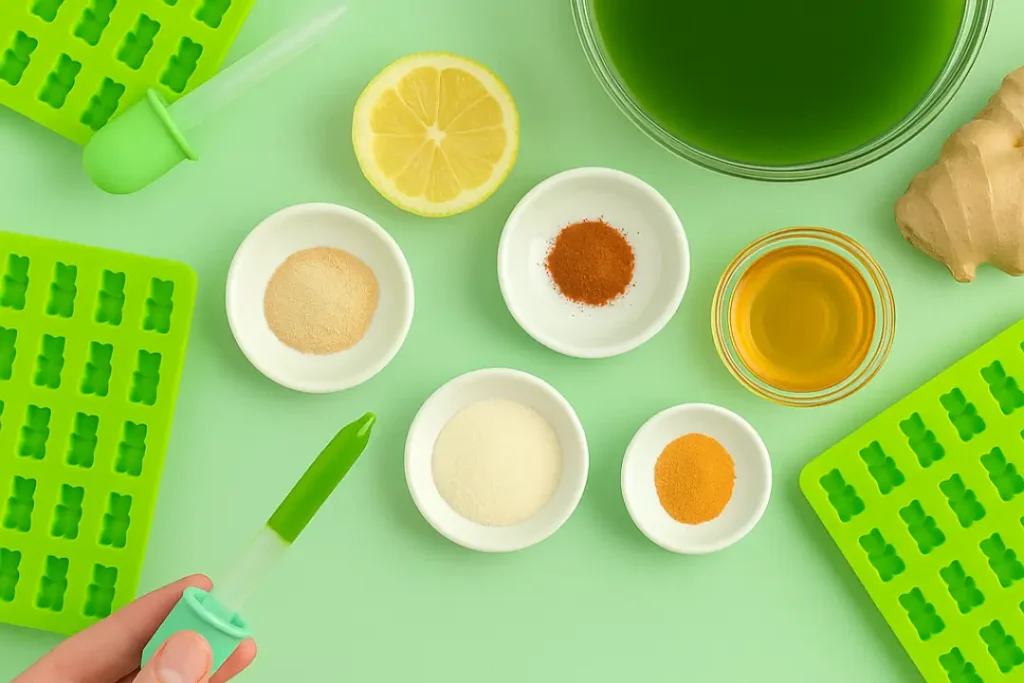
- 1 cup green apple juice cold-pressed if possible
- 1 tablespoon fresh lemon juice
- 2 tablespoons grated fresh ginger or 1 teaspoon ground ginger
- 2 to 3 tablespoons raw honey or maple syrup to taste
- 3 tablespoons unflavored gelatin or 1½ teaspoons agar agar for vegan option
- 1 pinch cayenne optional, for extra zing
Instructions
- Place silicone gummy molds on a flat tray for easy transfer to the fridge.
- In a small saucepan, combine green apple juice, lemon juice, ginger, and sweetener. Warm over medium-low heat for 5 minutes (do not boil).
- Remove from heat and let cool slightly until warm but not hot. Strain to remove ginger pieces if desired.
- In a small bowl, sprinkle gelatin over 1–2 tablespoons of water and stir until thickened.
- Stir bloomed gelatin into the warm juice mixture over low heat until fully dissolved. Do not boil.
- Quickly fill silicone molds using a spoon or dropper. The mixture will begin to set as it cools.
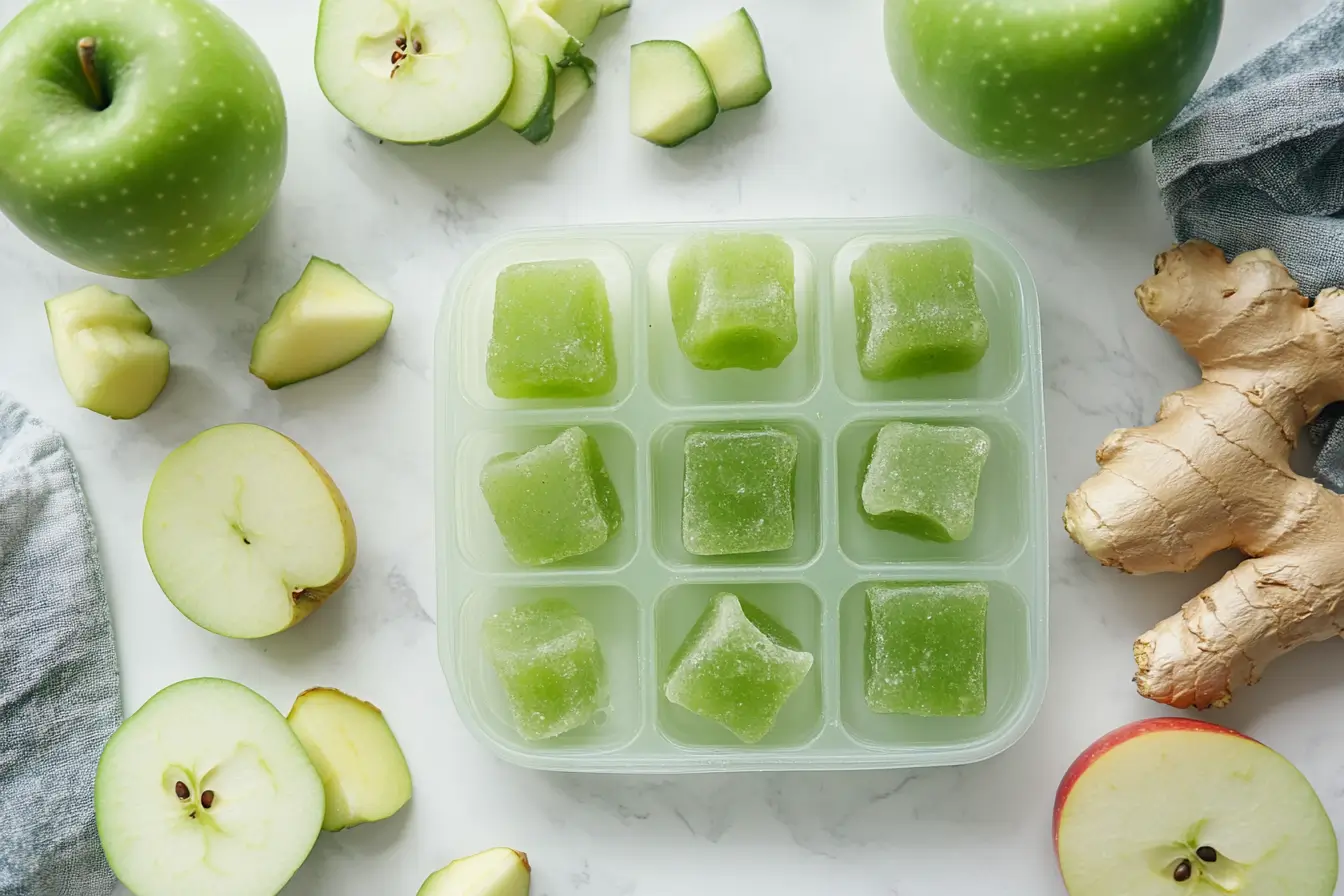
- Chill molds in the fridge for 30–60 minutes until fully set.
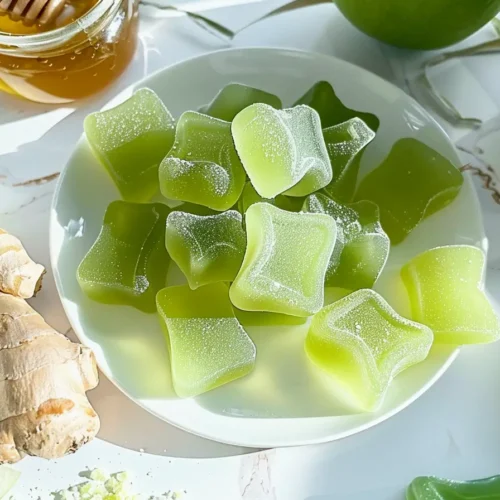
- Remove gummies from molds and store in an airtight container in the fridge. Use within 10 days.
Notes
Nutrition

Why Ginger Deserves the Spotlight
That warm tingle you feel? It’s thanks to gingerol and shogaol, powerful compounds in ginger that:
-
Fight inflammation
-
Soothe nausea and bloating
-
Reduce menstrual and joint pain
-
Lower blood sugar and cholesterol
According to Healthline’s research on ginger’s benefits, these properties make ginger one of the most effective natural remedies for digestive health and inflammation. When combined with the polyphenols in green apple and vitamin C in lemon, DIY Green Apple Ginger Gummies become a triple-threat for gut health, immunity, and energy.
Makes These Gummies So Powerful?
Each little gummy combines powerhouse ingredients that work together to support digestion, immunity, and inflammation:
-
Green Apple Juice – Crisp, naturally tart, and lower in sugar than most juices. It’s full of polyphenols and gut-friendly fiber.
-
Ginger – The anti-inflammatory MVP. Ginger helps with bloating, circulation, and immune defense. According to Healthline, it’s also shown to ease joint pain and support blood sugar balance.
-
Lemon Juice – Boosts vitamin C and antioxidant absorption while adding a fresh citrus lift.
-
Honey or Maple Syrup – A little sweetness with natural antimicrobial and anti-inflammatory benefits.
-
Unflavored Gelatin (or Agar Agar) – Not just for texture—gelatin supports joint and skin health through its collagen content.
DIY Green Apple Ginger Gummies Recipe
Prep Time: 10 minutes
Cook Time: 5 minutes
Chill Time: 30–60 minutes
Yield: About 50 small gummies
🛒 Ingredients
-
1 cup green apple juice (cold-pressed if possible)
-
1 tablespoon fresh lemon juice
-
2 tablespoons grated fresh ginger (or 1 teaspoon ground ginger)
-
2–3 tablespoons raw honey or maple syrup (to taste)
-
3 tablespoons unflavored gelatin (or 1½ teaspoons agar agar for vegan option)
-
Optional: pinch of cayenne for a little heat
Instructions
Step 1: Prep the Setup
Place silicone gummy molds on a tray for easy fridge transfer.
Step 2: Simmer the Base
In a small saucepan, combine green apple juice, lemon juice, ginger, and sweetener. Heat gently (do not boil) for about 5 minutes. This infuses the juice with spicy-sweet goodness.
Step 3: Strain & Cool Slightly
Let the mixture cool a bit—still warm, not hot. Strain out the ginger if you prefer a smoother gummy.
Step 4: Bloom the Gelatin
In a small bowl, bloom the gelatin by sprinkling it over 1–2 tablespoons of cold water. Stir until thickened. Then add the bloomed gelatin to the warm juice and whisk until fully dissolved over low heat.
Step 5: Fill the Molds
Using a dropper or spoon, fill the molds quickly before the mixture begins to set.
Step 6: Chill
Refrigerate for 30–60 minutes, or until fully set.
Step 7: Store & Snack
Pop the gummies out and store in an airtight container in the fridge. They’ll stay fresh for up to 10 days—but trust us, they won’t last that long.
Customization Ideas
-
Add a Kick: A pinch of cayenne or black pepper supports metabolism and adds depth.
-
Go Herbal: Infuse the juice with chamomile or green tea for a calming or antioxidant bonus.
-
Make It Vegan: Use agar agar, but follow package instructions—it sets faster than gelatin.
-
No Molds? Pour the mixture into a lined baking dish, chill, and cut into squares.
When Should You Eat DIY Green Apple Ginger Gummies?
These little bursts of wellness can fit into your routine anytime:
-
Morning: Kickstart your digestion with ginger’s zing.
-
Afternoon: Recharge without the crash.
-
Post-meal: Help soothe the stomach and squash sugar cravings.
You can enjoy DIY Green Apple Ginger Gummies daily—3 to 5 per day is a great range for most people.
Why Ginger Deserves the Spotlight
That warm tingle you feel? It’s thanks to gingerol and shogaol, powerful compounds in ginger that:
-
Fight inflammation
-
Soothe nausea and bloating
-
Reduce menstrual and joint pain
-
Lower blood sugar and cholesterol
When combined with the polyphenols in green apple and vitamin C in lemon, DIY Green Apple Ginger Gummies become a triple-threat for gut health, immunity, and energy.
Storage Tips
-
Fridge Only: These gummies are made with real juice, so keep them cool.
-
Use Glass: Want them to look chic? Store them in a glass jar.
-
Clean Hands Only: Moisture shortens shelf life, so avoid touching them with wet fingers.
Final Thoughts: Your Daily Dose of Wellness
These DIY Green Apple Ginger Gummies aren’t just a recipe—they’re a wellness ritual. Packed with digestion-supporting ginger, antioxidant-rich lemon, and the tart freshness of green apple, they’re a smart, simple, and seriously tasty way to support your body.
Make a batch. Keep them in the fridge. And treat yourself to the kind of snack that feels like a win for both your tastebuds and your health.
Ready to level up your snack game with DIY Green Apple Ginger Gummies? Your body will thank you—one zingy gummy at a time.
Follow me on Facebook and Pinterest for daily wellness treats, DIY snacks, and flavorful ideas you’ll love .
FAQ: DIY Green Apple Ginger Gummies
What does apple cider vinegar and ginger gummies do?
Apple cider vinegar (ACV) and ginger gummies support digestion, reduce bloating, and may help regulate blood sugar. ACV promotes healthy gut bacteria and can curb appetite, while ginger fights inflammation and soothes the stomach. While these DIY Green Apple Ginger Gummies don’t include ACV, you could easily add a splash for an extra wellness boost.
How long do homemade fruit gummies last?
When stored properly in the fridge in an airtight container, homemade fruit gummies—like these DIY Green Apple Ginger Gummies—last up to 10 days. Be sure your hands are dry when grabbing them to avoid introducing moisture that could cause them to spoil faster.
How to make apple gummies with gelatin?
It’s simple! Simmer apple juice with fresh lemon and ginger, sweeten with honey or maple syrup, then whisk in bloomed gelatin until fully dissolved. Pour into molds and chill. For a full walk-through, check the recipe steps above for making DIY Green Apple Ginger Gummies.
What is green apple gummies?
Green apple gummies are chewy snacks made with green apple juice, often blended with other wellness ingredients like ginger or lemon. In this recipe, DIY Green Apple Ginger Gummies offer a tart, refreshing flavor with functional health benefits—making them way more than just candy.