
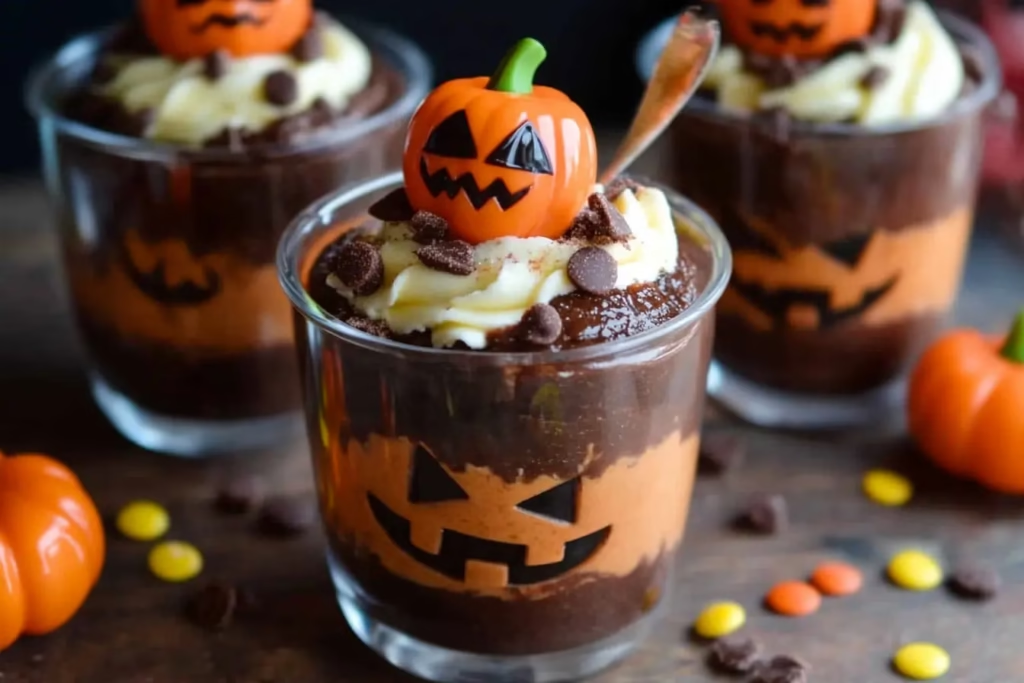
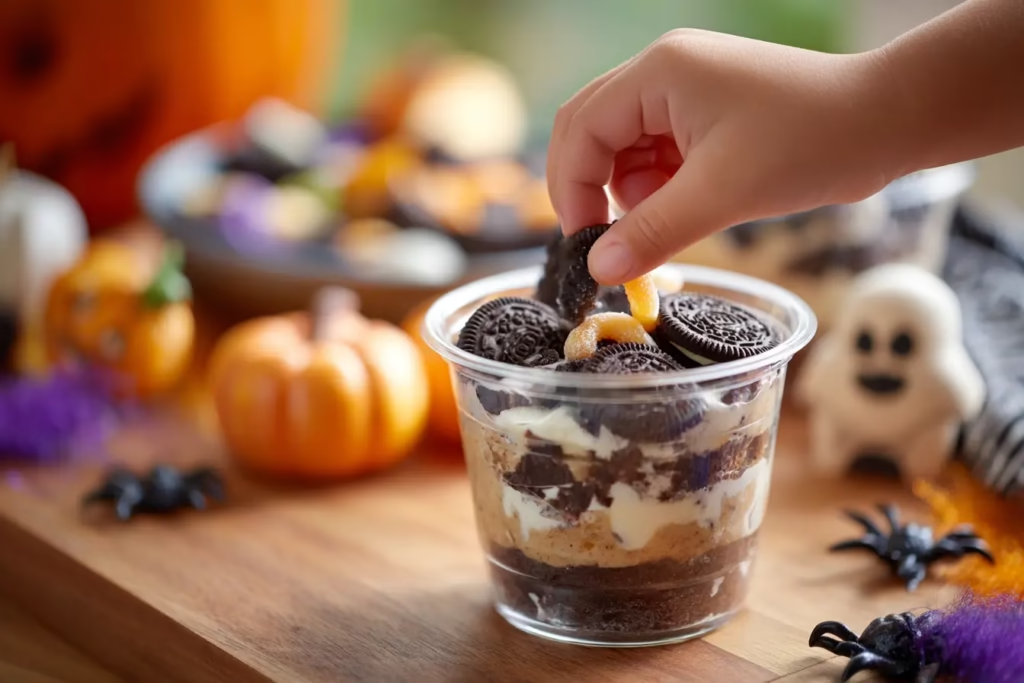
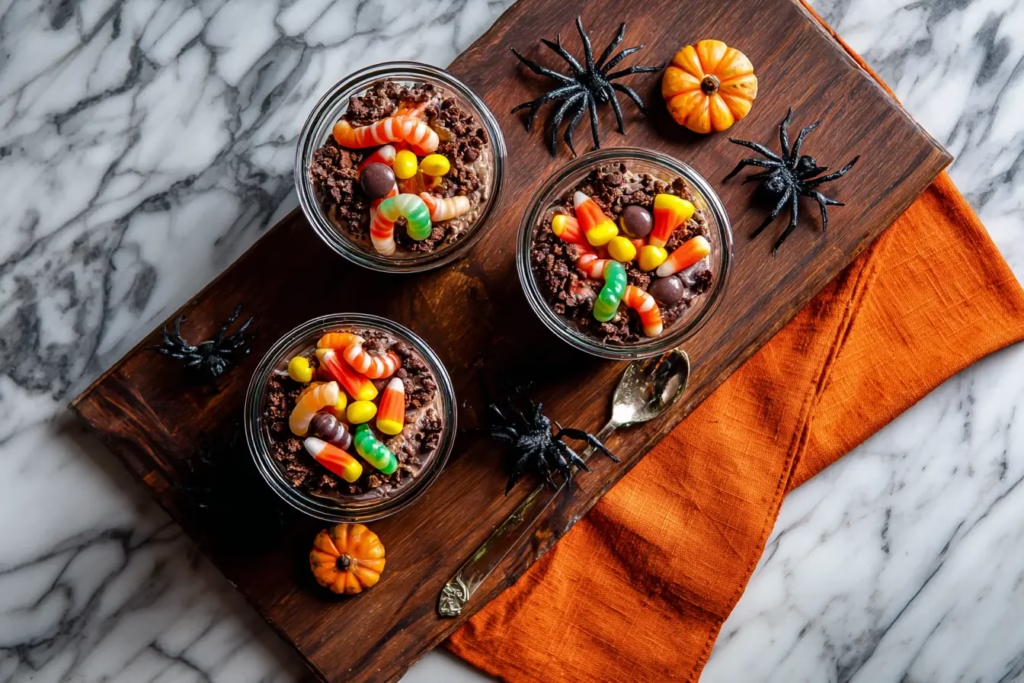
The minute spooky season hits, my kitchen becomes a DIY dessert laboratory. Between candy eyeballs, crushed Oreos, and all things orange and black, I live for those creepy-yet-cute treats that make the kids giggle and adults sneak seconds. One of my all-time favorites to whip up? These Halloween Dirt Cups—a no-bake, budget-friendly dessert that comes together in minutes and looks like it took all afternoon.
They’re wiggly. They’re wormy. They’re layered with soft pudding, crushed cookies, and goofy toppings like pumpkins, ghosts, and bones. Basically, Halloween in a cup.
Halloween Dirt Cups
Ingredients
- 4 cups milk any variety, divided
- 1 box (3.4 oz) instant chocolate pudding mix
- 1 box (3.4 oz) instant vanilla pudding mix
- few drops orange food coloring or red + yellow mix
- 1 cup gummy worms
- 22 Oreo cookies, crushed or gluten-free sandwich cookies
- 24 candy pumpkins
- 2 tablespoons bone sprinkles optional
Instructions
- Whisk chocolate pudding mix with 2 cups milk until thickened. Chill for 5–10 minutes.
- Whisk vanilla pudding mix with remaining 2 cups milk until thickened. Stir in orange food coloring until bright pumpkin orange. Chill for 5–10 minutes.
- Spoon half the chocolate pudding evenly into 8 clear cups as the base layer.
- Add a few gummy worms on top, letting some poke out of the sides.
- Sprinkle 1/3 of the crushed Oreos over the worms.
- Spoon half the orange vanilla pudding evenly over the Oreo layer. Smooth with the back of a spoon.
- Add another 1/3 of the crushed Oreos as the second cookie layer.
- Spoon remaining chocolate pudding over the Oreos.
- Finish with the rest of the crushed Oreos on top. Decorate each cup with 3 candy pumpkins and a sprinkle of bone sprinkles.
- Chill until ready to serve. Can be made up to a day ahead.
Notes
Nutrition
Why You’ll Love These Halloween Dirt Cups
Creepy Yet Cute Party Treats
What makes these dirt cups irresistible isn’t just the taste—it’s the spooky Halloween vibe they bring to any party table. Whether you decorate them with gummy worms, candy pumpkins, or sprinkles shaped like bones, each one becomes a mini edible graveyard that’s just the right amount of creepy.
Kid-Friendly Halloween Recipes
The best part? These are super easy no-bake Halloween desserts that kids can actually help make. Set up a little decorating station with candy toppings, and let your little monsters go wild.
No Oven, No Problem
We’re talking no-bake Halloween dessert ideas that require zero oven time. Just whisk, layer, chill, and serve. Perfect for last-minute classroom snacks or stress-free hosting.
Budget-Friendly Fun
Pudding, Oreos, and a handful of candy. That’s it. These budget-friendly Halloween treats are made with pantry staples and still manage to look like something from a Pinterest board.
Ingredients Breakdown & Easy Swaps
Let’s break down what you’ll need to create these layered dirt cake cups, and a few ways you can tweak them to fit your dietary needs or pantry stock.
Milk (4 cups, divided)
Use any milk you prefer—whole milk for a richer texture, almond or oat milk for a dairy-free version.
Chocolate Pudding Mix (1 box, 3.4 oz)
Instant chocolate pudding gives the “dirt” layer its delicious chocolate flavor. You can also use chocolate mousse or plant-based pudding alternatives.
Vanilla Pudding Mix (1 box, 3.4 oz)
This gives us the bright orange layer when dyed with food coloring. Substitute with white chocolate or cheesecake pudding for a twist.
Orange Food Coloring
Mix red + yellow if you don’t have orange on hand.
Gummy Worms (1 cup)
No dirt cup is complete without them. Try sour worms or even snake candies for fun.
Oreo Cookies (22, crushed)
Classic choice for the “soil” layer. Gluten-free sandwich cookies work great here too.
Candy Pumpkins (24)
They add that pumpkin patch vibe on top. You could also use candy eyeballs, ghosts, or mini tombstones.
Bone Sprinkles (2 tbsp, optional)
These just push the whole thing into Pinterest-worthy territory.
How to Make Halloween Dirt Cups (Step-by-Step)
STEP 1: Prepare Your Puddings
In two separate bowls, whisk your instant chocolate and vanilla pudding mixes with milk until thick. Chill them until set (about 5–10 minutes in the fridge).
STEP 2: Color the Vanilla Pudding
Add a few drops of orange food coloring to the vanilla pudding. Mix well until it turns pumpkin orange. Adjust with more food coloring if needed.
STEP 3: Build the First Chocolate Layer
Spoon half of the chocolate pudding evenly into 8 clear cups. Spread it out as the base “soil.”
STEP 4: Add Gummy Worms
Place a few gummy worms directly on the pudding—have them poking out the sides for that creepy crawly effect.
STEP 5: Add First Oreo Layer
Sprinkle 1/3 of the crushed Oreos over the worms. This makes them look like they’re buried in the dirt!
STEP 6: Orange Pudding Layer
Spoon half of the orange-colored vanilla pudding on top of the Oreo layer. Smooth it with the back of a spoon.
STEP 7: Second Oreo Layer
Add another layer of crushed Oreos—again about 1/3 of the total.
STEP 8: Top with More Chocolate Pudding
Spoon the rest of the chocolate pudding on top. You’re almost there.
STEP 9: Final Oreo Sprinkle + Decorations
Finish each cup with a final layer of Oreos, 3 candy pumpkins, and a sprinkle of bone sprinkles.
STEP 10: Chill & Serve
Keep chilled until ready to serve. These can be made a day ahead, making them perfect make-ahead Halloween desserts!
Fun Variations to Try
- Zombie Brain Cups: Swap orange pudding for green and top with marshmallow “brains.”
- Ghostly Graveyard Cups: Add a Milano cookie “tombstone” with RIP written in frosting.
- Pumpkin Patch Cups: Add crushed green candies around the pumpkins to look like vines.
Storage Tips
- Store in the fridge up to 3 days in airtight containers.
- Not freezer-friendly (the pudding gets weird), but you can prep the layers in advance and assemble day-of.
- Great for Halloween classroom party snacks or quick potluck desserts.
FAQs (People Also Ask)
1. Can I make Halloween Dirt Cups ahead of time?
Yes! You can prep and layer them up to a day in advance. Just keep them covered in the fridge and add final toppings right before serving to keep the decorations crisp.
2. Are Halloween Dirt Cups gluten-free?
They can be! Use gluten-free pudding mixes and sandwich cookies. Many major brands now make gluten-free Oreos that work perfectly.
3. What kind of cups should I use for serving?
Clear plastic or glass cups work best to show off the layers. Mason jars or mini dessert cups are especially cute for parties.
4. Can kids help make these?
Absolutely. These kid-friendly Halloween recipes are perfect for little hands—no baking involved, just scooping and decorating!
More Fall & Halloween Recipes You’ll Love
Looking for more spooky treats to pair with your Halloween Dirt Cups? Check these out:
- Mint Chocolate Monster Cookies – chewy, minty, and dotted with candy eyeballs
- Halloween Cupcakes – with cream cheese icing and ghost toppers
- For even more festive fun, browse our full Halloween & Fall Recipe Collection
Pinterest-Worthy Finishing Touch
Serve your dirt cups with cute Halloween spoons or tiny graveyard flags, and you’ve got a dessert that’s ready to go viral on TikTok or rack up the saves on Pinterest.
📌 Pin it, make it, and tag us when you do!
💬 Follow along on Facebook for more spooky inspiration.