There’s something undeniably delightful about cake pops. They’re bite-sized, irresistibly delicious, and make for the perfect party treat or sweet indulgence. But when you add the charm of red velvet cake into the mix? Now we’re talking about a whole new level of dessert perfection! Red Velvet Cake Pops combine the rich, cocoa-kissed flavors of red velvet cake with creamy frosting, all wrapped in a decadent chocolate shell. Whether you’re making them for a special occasion, as a gift, or just because (we totally support that!), these little pops of joy are sure to steal the spotlight. If you’re looking for another fun Easter treat, check out these Chocolate Pretzel Easter Nests!
What Makes Red Velvet Cake Pops Special?
Red velvet cake is already a fan favorite, thanks to its mild cocoa flavor and signature deep red hue. When transformed into cake pops, it becomes a portable, handheld treat that delivers all the classic red velvet goodness in just one bite. Plus, they’re perfect for customizing with different coatings, sprinkles, and decorations to match any theme or celebration! Looking for more delicious dessert ideas? Try this Snickers Strawberry Cheesecake for a delightful twist!
Ingredients You’ll Need
For the Cake:
- 1 1/4 cups all-purpose flour
- 1 cup granulated sugar
- 1/2 teaspoon baking soda
- 1/2 teaspoon salt
- 1/2 teaspoon cocoa powder
- 1/2 cup unsalted butter, softened
- 2 large eggs
- 1/2 cup buttermilk
- 1 teaspoon vanilla extract
- 1 teaspoon white vinegar
- 1 tablespoon red food coloring
For the Frosting:
- 4 ounces cream cheese, softened
- 1/4 cup unsalted butter, softened
- 1 1/2 cups powdered sugar
- 1/2 teaspoon vanilla extract
For the Coating:
- 12 ounces white or dark chocolate melting wafers
- Sprinkles, crushed nuts, or decorative sugar (optional)
- Lollipop sticks
How to Make Red Velvet Cake Pops
Step 1: Bake the Cake
Start by preheating your oven to 350°F (175°C). Grease and flour a 9-inch cake pan. In a medium bowl, whisk together the flour, sugar, baking soda, salt, and cocoa powder. In a separate large bowl, beat the butter and eggs until smooth. Add the buttermilk, vanilla extract, white vinegar, and red food coloring, and mix until combined. Gradually add the dry ingredients to the wet ingredients, mixing until smooth. Pour the batter into the prepared pan and bake for 25–30 minutes, or until a toothpick inserted into the center comes out clean. Let the cake cool completely. If you’re in the mood for another fun holiday treat, check out these Rice Krispie Easter Eggs!
Step 2: Prepare the Cake Mixture
Once the cake has cooled, crumble it into fine crumbs in a large bowl. Add the softened cream cheese, butter, powdered sugar, and vanilla extract. Use your hands or a mixer to blend everything together until it forms a dough-like consistency. The mixture should be moist enough to hold its shape when rolled into balls.
Step 3: Shape and Chill
Scoop out small portions of the cake mixture and roll them into evenly sized balls, about 1 inch in diameter. Place them on a parchment-lined baking sheet. Once all the cake balls are formed, refrigerate them for at least 1 hour or freeze them for 20 minutes. This helps them firm up, making them easier to dip in chocolate.
Step 4: Insert the Sticks
Melt a small amount of chocolate melting wafers according to package instructions. Dip the tip of each lollipop stick into the melted chocolate, then insert it halfway into a cake ball. This step helps secure the stick inside the cake pop. Repeat for all the cake balls, then return them to the fridge for 10 minutes to set. Interested in learning about different cheesecake styles? Read about The Three Types of Cheesecake!
Step 5: Dip in Chocolate
Melt the remaining chocolate melting wafers in a microwave-safe bowl, stirring every 20 seconds until smooth. Holding the cake pop by the stick, dip it into the melted chocolate, ensuring it’s fully coated. Gently tap off any excess chocolate, then immediately decorate with sprinkles, crushed nuts, or decorative sugar if desired.
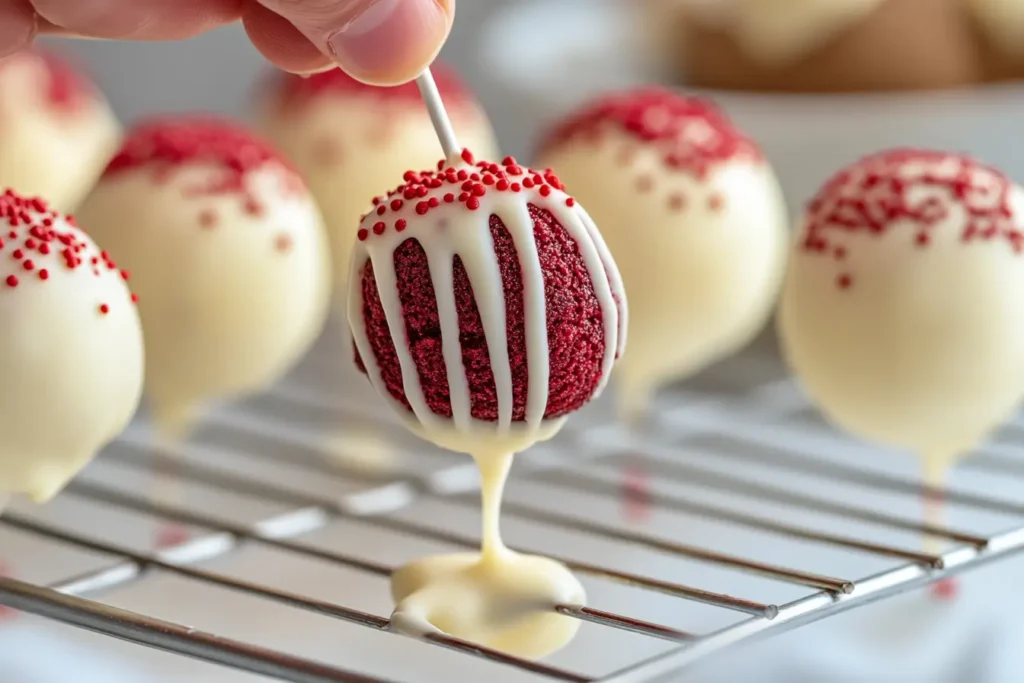
Step 6: Let Them Set
Place the dipped cake pops upright in a cake pop stand or insert them into a styrofoam block to keep them steady while the chocolate hardens. Let them set at room temperature for about 30 minutes or until the coating is firm.
Pro Tips for Perfect Cake Pops
- Don’t Overmix the Cake Mixture: You want it to be just moist enough to hold its shape, not overly mushy.
- Chill, Chill, Chill: Keeping the cake pops cool before dipping prevents them from falling apart in the melted chocolate.
- Use the Right Chocolate: Melting wafers work best because they create a smooth, even coating without the need for tempering.
- Thin the Chocolate If Needed: If the chocolate is too thick for dipping, stir in a teaspoon of vegetable oil or coconut oil to loosen it up.
- Decorate Quickly: Add sprinkles or decorations immediately after dipping, before the chocolate sets. Looking for a refreshing drink to pair with these cake pops? Try this Pink Drink Recipe!
Storage and Serving
- Room Temperature: Cake pops can be stored at room temperature in an airtight container for up to 2 days.
- Refrigerated: For longer freshness, keep them in the fridge for up to a week.
- Frozen: You can freeze undecorated cake pops for up to 2 months. Just let them thaw before coating them in chocolate.

Fun Variations
- Drizzle Effect: Instead of fully dipping, drizzle white chocolate over dark chocolate-coated cake pops for an elegant look.
- Different Flavors: Add a splash of almond extract, orange zest, or peppermint extract to the frosting for a twist.
- Holiday-Themed: Use themed sprinkles or colored chocolate for festive cake pops (red and green for Christmas, pink and white for Valentine’s Day, etc.).
The Perfect Party Treat
Red Velvet Cake Pops are the ultimate dessert for any occasion—birthday parties, weddings, baby showers, or just a fun weekend baking project. They’re as beautiful as they are delicious, and their bite-sized nature makes them irresistible to guests of all ages. Whether you’re making them for a celebration or as a sweet personal treat, these cake pops are guaranteed to be a hit. Pair them with a festive Grinch Punch for an extra fun treat!
So go ahead, grab that mixing bowl, and treat yourself to these adorable, flavor-packed little delights. Happy baking!

Red Velvet Cake Pops
Ingredients
- 1 1/4 cups all-purpose flour for cake
- 1 cup granulated sugar for cake
- 1/2 teaspoon baking soda for cake
- 1/2 teaspoon salt for cake
- 1/2 teaspoon cocoa powder for cake
- 1/2 cup unsalted butter, softened for cake
- 2 large eggs for cake
- 1/2 cup buttermilk for cake
- 1 teaspoon vanilla extract for cake
- 1 teaspoon white vinegar for cake
- 1 tablespoon red food coloring for cake
- 4 ounces cream cheese, softened for frosting
- 1/4 cup unsalted butter, softened for frosting
- 1 1/2 cups powdered sugar for frosting
- 1/2 teaspoon vanilla extract for frosting
- 12 ounces white or dark chocolate melting wafers for coating
- sprinkles, crushed nuts, or decorative sugar optional for decorating
- lollipop sticks
Instructions
- Preheat the oven to 350°F (175°C). Grease and flour a 9-inch cake pan.
- In a medium bowl, whisk together flour, sugar, baking soda, salt, and cocoa powder.
- In a separate large bowl, beat butter and eggs until smooth. Add buttermilk, vanilla extract, white vinegar, and red food coloring. Mix until combined.
- Gradually add the dry ingredients to the wet ingredients, mixing until smooth.
- Pour batter into the prepared pan and bake for 25–30 minutes, or until a toothpick inserted in the center comes out clean. Let the cake cool completely.
- Crumble the cooled cake into fine crumbs in a large bowl.
- Add cream cheese, butter, powdered sugar, and vanilla extract to the crumbs. Mix until a dough-like consistency forms.
- Scoop out small portions and roll into 1-inch balls. Place on a parchment-lined baking sheet.
- Refrigerate cake balls for at least 1 hour or freeze for 20 minutes until firm.
- Melt a small amount of chocolate. Dip the tip of each lollipop stick into the chocolate, then insert halfway into a cake ball. Chill for 10 minutes to set.
- Melt remaining chocolate wafers. Dip each cake pop into the melted chocolate to coat fully. Gently tap off any excess.
- Immediately decorate with sprinkles, nuts, or sugar if desired.
- Place dipped cake pops upright in a stand or styrofoam block. Let them set for about 30 minutes until firm.
Notes